If you're interested in functional programming, you might also want to checkout my second blog which i'm actively working on!!

Thursday, May 20, 2010

Multi environment project configuration

Often you need to configure your application for multiple staging environments like 'dev', 'test', 'prod'. I've used the Cocoon Spring Configurator a few times. It let's you configure environment specific properties, create the artifact once and deploy it on multiple staging environments. The only thing you need to set is a system variable to specify runtime behaviour.

But you can actually accomplish the same behaviour with little work as i will explain in this article. Let's take a look at my project structure:


I created a folder 'properties' in src/main/resources in which i included following property files:
  • dev.properties
  • test.properties
  • prod.properties
  • generic.properties --> shared properties for all environments
To get access to all these properties I specified a PropertyPlaceHolderConfigurer in src/main/resoures/application-context.xml as follows:


The only thing you need to do now is specify a systemvariable called 'environment.id'. In order to run my unit tests automically with maven i added this variable to surefure plugin in the pom.xml.


In my unit test i set the application-context.xml.


The unit test will not run however without the system variable so if you want to run the unit test from within Eclipse for example you need to specify this variable in the run configuration in the second tab 'Arguments' and more specific 'VM arguments'.

Here you can specify it as follows:
-Denvironment.id=dev
Wednesday, May 12, 2010

Exist DB: how to use REST

I was taking a look at how-to use the REST API from Exist and BaseX and tried to write a unified resuable API for following use case:
- PUT (insert resource into database)
- DELETE (delete resource from database)
- POST (to query the database)

And this is what i ended up with:


And finally some unit test:

Tuesday, May 4, 2010

Apache Cocoon: The sitemap servlet

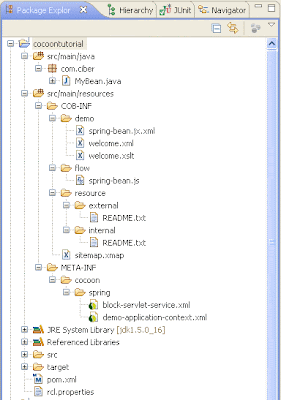
In order to understand how a Cocoon block works we need to take a look at
src/main/resources/META-INF/cocoon/spring/block-servlet-service.xml

This file is a spring bean configuration file in which our sitemap servlet is configured. It describes we want to create an instance of the class 'org.apache.cocoon.sitemap.SitemapServlet' and name it 'com.ciber.cocoontutorial.service'.

The mount-path means that any request starting with '/cocoontutorial' will be dispatched to this servlet. The nice thing about a sitemap servlet is that we configure it's behaviour without ever having to write a single line of code. The configuration file is called sitemap.xmap and is located at
src/main/resources/COB-INF/sitemap.xmap.


Since I want to explain everything step-by-step I stripped everything from the sitemap.xmap which
was used for the sample. We're gonna create a much more advanced application so get ready for some action.


Important to know is that there is a 'map:flow' element (used for defining our flow controllers). .There are also 2 default pipelines to read internal and external resources from within your application. Css, Javascript and images would typically be stored inside the resource/external folder. Anything that would be application sensitive could be stored under resource/internal. The actual fact that these last resources are not available externally is configured by setting the attribute internal-only="true".


In the next article we'll start with explaining some sitemap components.

Monday, May 3, 2010

Apache Cocoon: Quick start

Prerequisites:

- JDK1.5
- Maven2

(1) Open a shell (cygwin/dos/...) and move into your workspaces folder
(2) Run following command (Maven2 Cocoon archetype) to create a new project based on the 'Cocoon block' archetype which comes with some samples.


D:\workspaces>mvn archetype:generate -DarchetypeCatalog=http://cocoon.apache.org
[INFO] Scanning for projects...
[INFO] Searching repository for plugin with prefix: 'archetype'.
[INFO] ------------------------------------------------------------------------
[INFO] Building Maven Default Project
[INFO] task-segment: [archetype:generate] (aggregator-style)
[INFO] ------------------------------------------------------------------------
[INFO] Preparing archetype:generate
[INFO] No goals needed for project - skipping
[INFO] Setting property: classpath.resource.loader.class => 'org.codehaus.plexus.velocity.ContextClassLoaderResourceLoader'.
[INFO] Setting property: velocimacro.messages.on => 'false'.
[INFO] Setting property: resource.loader => 'classpath'.
[INFO] Setting property: resource.manager.logwhenfound => 'false'.
[INFO] [archetype:generate]
[INFO] Generating project in Interactive mode
[INFO] No archetype defined. Using maven-archetype-quickstart (org.apache.maven.archetypes:maven-archetype-quickstart:1.0)
Choose archetype:
1: http://cocoon.apache.org -> cocoon-22-archetype-block-plain (Creates an empty Cocoon block; useful if you want to add another block to a Cocoon application)
2: http://cocoon.apache.org -> cocoon-22-archetype-block (Creates a Cocoon block containing some small samples)
3: http://cocoon.apache.org -> cocoon-22-archetype-webapp (Creates a web application configured to host Cocoon blocks. Just add the block dependencies)
Choose a number: (1/2/3): 2
Define value for groupId: : com.ciber
Define value for artifactId: : cocoontutorial
Define value for version: 1.0-SNAPSHOT: :
Define value for package: com.ciber: :
Confirm properties configuration:
groupId: com.ciber
artifactId: cocoontutorial
version: 1.0-SNAPSHOT
package: com.ciber
Y: : y
[INFO] ----------------------------------------------------------------------------
[INFO] Using following parameters for creating OldArchetype: cocoon-22-archetype-block:1.0.0
[INFO] ----------------------------------------------------------------------------
[INFO] OldArchetype created in dir: D:\workspaces\spider\cocoontutorial
....
[INFO] ------------------------------------------------------------------------
[INFO] BUILD SUCCESSFUL
[INFO] ------------------------------------------------------------------------
[INFO] Total time: 1 minute 4 seconds
[INFO] Finished at: Mon May 03 16:16:37 CEST 2010
[INFO] Final Memory: 8M/14M
[INFO] ------------------------------------------------------------------------


(3) Now move into the newly created folder 'cocoontutorial' and run


D:\workspaces\cocoontutorial>mvn eclipse:eclipse
[INFO] Scanning for projects...
[INFO] Searching repository for plugin with prefix: 'eclipse'.
[INFO] ------------------------------------------------------------------------
[INFO] Building cocoontutorial
[INFO] task-segment: [eclipse:eclipse]
[INFO] ------------------------------------------------------------------------
[INFO] Preparing eclipse:eclipse
[INFO] No goals needed for project - skipping
[INFO] [eclipse:eclipse]
[INFO] Using as WTP server : null
[INFO] Adding default classpath contaigner: org.eclipse.jdt.launching.JRE_CONTAINER
[INFO] Using source status cache: D:\workspaces\cocoontutorial\target\mvn-eclipse-cache.properties
[INFO] Not writing settings - defaults suffice
[INFO] Wrote Eclipse project for "cocoontutorial" to D:\workspaces\cocoontutorial.
...
[INFO] ------------------------------------------------------------------------
[INFO] BUILD SUCCESSFUL
[INFO] ------------------------------------------------------------------
------
[INFO] Total time: 10 seconds
[INFO] Finished at: Mon May 03 16:23:54 CEST 2010
[INFO] Final Memory: 16M/29M
[INFO] ------------------------------------------------------------------------


Now we're ready to import the newly created project into Eclipse.

(4) Right-click in the package explorer and select 'Import' -> 'existing Projects into workspace' -> press Next -> Browse and select the new project -> press Finish


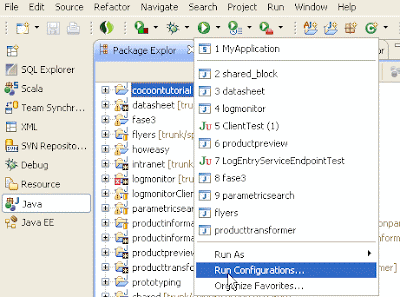
(5) Create a new run configuration (see screenshots)


(6) Press the run button to start jetty


(7) Point your browser to http://localhost:8888/cocoontutorial/